A significant amount of Windows 10 users who have installed the Creators Update on their computers are reporting their computers crashing at completely odd times and rebooting. Reports suggest that computers affected by this problem can crash and reboot even when its hardware is not being particularly stressed and CPU temperatures, GPU temperatures and all other attributes are completely optimal. Checking the Windows Event Logs on computers affected by this issue isn’t any help as the only events recorded in the logs state that the previous system shutdown was unexpected.
The leading causes of this problem have been determined to be problematic third-party applications, network and internet connection issues, and problems with device drivers (which, more often than not, turn out to be GPU drivers). If your Windows 10 computer has been spontaneously crashing and rebooting without any apparent reason following the Creators Update, we have listed the most effective solutions that you can use to try and resolve the problem Note: The crashing issue after the Fall Creators Update (1709) is addressed in the end.
Solution 1: Uninstall any problematic third-party programs
Some third-party applications – such as Speccy, Acronis True Image, the Office Hub App and most third-party security programs (antivirus, antimalware and firewall applications) – can clash with Windows 10 post-Creators Update, leading to the user experiencing this problem. If such a third-party program is the cause of this issue in your case, simply uninstall any problematic third-party programs installed on your computer, and your computer should no longer be suffering from this issue.
Solution 2: Reset your computer’s Winsock catalog
If your Windows 10 computer is experiencing this problem because of internet connection or network issues, resetting its Winsock catalog is a good place to start. In order to reset a Windows 10 computer’s Winsock catalog, you need to:
Solution 3: Ensure that your chipset drivers and BIOS firmware are up to date
Once the Creators Update has been installed on a Windows 10 computer, issues such as this one can come to life if the computer in question has outdated chipset drivers or outdated BIOS firmware. To make sure that’s not the case, make your way to the Downloads section of the official website of your computer’s manufacturer (or the manufacturer of your computer’s motherboard) and check to see whether or not the chipset drivers and BIOS firmware installed on your computer are the latest versions. If you find that a newer version of the BIOS firmware for your computer or any of your computer’s chipset drivers is available, immediately download and install it as an outdated one could’ve been the cause of your sorrows.
Solution 4: Update the drivers for your computer’s network adapter
Outdated network adapter drivers can also turn out to be the cause of this problem in many cases. To make sure that the drivers for your computer’s network adapter are up to date, first, you need to press the Windows logo key + X to open the WinX Menu, click on Device Manager, double-click on the Network adapters section to expand it, determine which one is your computer’s active network adapter and note the name of its manufacturer. Once that’s done, simply navigate to the Downloads section of the official website of the manufacturer of your computer’s network adapter and check for the newest version of the drivers available for your specific network adapter.
If it turns out that you have an older version of the drivers, simply download and install the latest version of the network adapter’s drivers and that should get the job done.
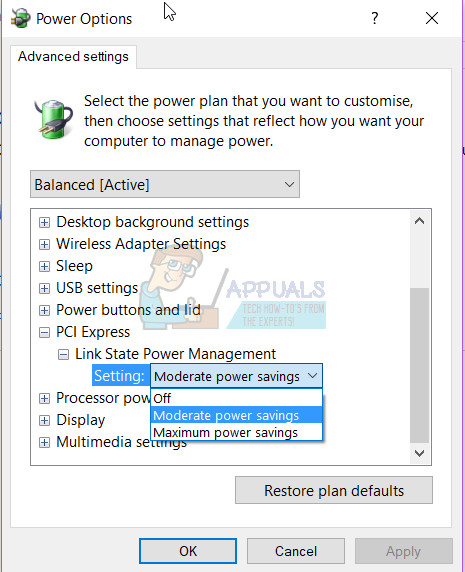
Solution 5: Turn Link State Power Management off
Check to see whether or not the issue has been fixed as soon as the computer boots up.
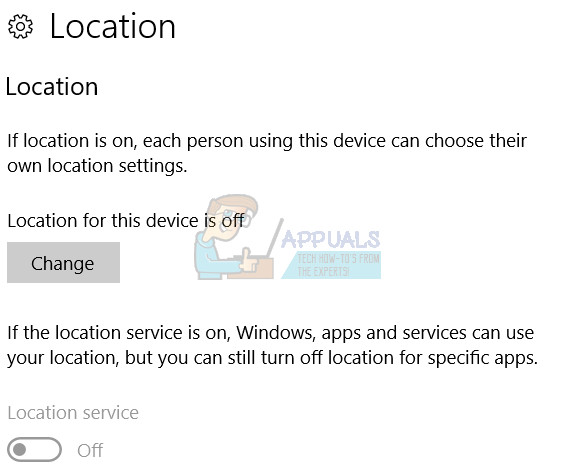
Solution 6: Turn off your computer’s Location Service
Many Windows 10 users affected by this problem have reported success in getting rid of it by simply turning off their computer’s Location Service. To disable the Location Service on a Windows 10 computer, you need to:
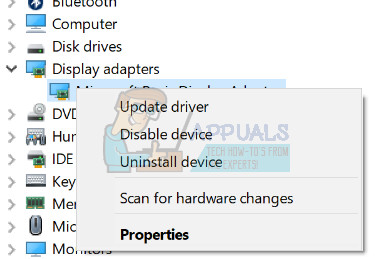
Solution 7: Disable and then re-enable your computer’s graphics card
For many Windows 10 users affected by this issue, simply disabling and then re-enabling their computer’s GPU from the Device Manager has done the trick and resolved this issue. To disable and then re-enable a Windows 10 computer’s graphics card, you need to:
Wait for the computer to boot up and check to see whether or not this solution did the trick. While you’re at it, you should also go to the Downloads section of the official website of the manufacturer of your computer’s graphics card and make sure that you have the latest version of the drivers for your specific GPU and OS installed. If there is a newer version of drivers available for your GPU/OS combination, the outdated version is installed on your computer could be the culprit behind this problem, so be sure to download and install the latest version of the drivers.
Solution 8: Update your GPU drivers to version 382.05 (For NVIDIA users only)
Many Windows 10 users with NVIDIA GPUs who were affected by this problem were able to get rid of it by simply updating their GPU’s drivers to version 382.05. Version 382.05 of the drivers for NVIDIA graphics cards are much more compatible with the Windows 10 Creators Update than older versions and don’t cause Windows 10 computers to spontaneously crash and reboot. To update your NVIDIA GPU’s drivers to version 382.05, you need to: Once the drivers have been installed, simply restart your computer and check to see whether or not the problem has been fixed once it boots up.
Solution 9: Install GeForce Hotfix driver 381.78 (For NVIDIA users only)
When NVIDIA was informed that a significant amount of their graphics cards’ users who updated their computers to the Windows 10 Creators Update started experiencing an issue where their computers would spontaneously crash and reboot, they developed and released a Hotfix driver for the problem. A Hotfix driver is NVIDIA’s way of dealing with a vulnerability or problem with the drivers for their NVIDIA GPUs that are causing the user base grief and creating issues. If you are an NVIDIA user and are experiencing this problem, you should definitely download and install GeForce Hotfix driver 381.78. To install GeForce Hotfix driver 381.78, you need to:
Solution 10: Disable AMD Cool’n’Quiet and/or Fast Boot in BIOS
AMD Cool’n’Quiet is a CPU dynamic frequency scaling and power-saving technology designed by AMD and introduced by the company with its Athlon 64 line of processors. The technology basically reduces the processor’s clock rate and voltage when it is idle to save power. The Fast Boot option that comes with most Windows computers that have UEFI motherboards does exactly what its name suggests – it allows computers to boot up faster than they normally would. Both of these options which can be enabled and disabled in a Windows 10 computer’s BIOS have been identified as the cause of this issue in many cases. If you are experiencing this problem and have one or both of these features in your computer’s BIOS, disabling them just might rid your computer of the problem. In order to disable these features in a Windows 10 computer’s BIOS, you need to:
Solution 11: If you are using an SSD, update its firmware
Many Windows 10 users who have Windows 10 running out of SSDs (which, all things considered, is definitely a good idea) fall victim to this problem once they install the Creators Update because the firmware for their SSDs is outdated. Yes – whether or not the firmware for your SSD is up to date can be the difference between you having no problem with the Windows 10 Creators Update and you having a pretty big problem with it. To make sure that the firmware for your SSD is up to date, simply go to the Downloads section of the official website of your SSD’s manufacturer and check to see whether or not the firmware you have for your SSD is the latest one. If a newer version of your SSD’s firmware is available, you should immediately download and install it. Once your SSD’s firmware has been updated, restart your computer and check to see whether or not this solution gets the job done once it boots up.
Solution 12: If Nothing Works, Go Back to the Previous Build
Until such time when Microsoft releases a stable version, patch or update to address these issues. By going back to the previous build or doing a system restore, you’re going to defer the update. Taking Windows 10 back to the point before the Anniversary Update was installed will get you rid of the update. Chances are that in a few days, Microsoft will release patches and further updates to counter this issue so if you do a system restore or go back to the previous build, you can wait for a few days until further news from Microsoft and hopefully, by then an update or a patch should be available to address the issue and keep the AU.
Solution 13: Disabling Fast Boot from your BIOS (Post 1709 Update)
A major problem faced by many users after the Fall Creators Update was their computer crashing every once in a while. Many people reported that the computer crashed randomly with no set time. We traced back the problem to fast boot and hibernation. It seems that the new update contains some bad configurations that due to the fast boot, the computer crashes. If you have already gone through all the steps mentioned above, we can try disabling the fast boot option from your BIOS (motherboard). Most of the computers have different BIOS and have different configurations. Look around for “boot options” on your BIOS and make sure that fast boot (also known as the quick boot, MSI fast boot etc) is disabled. After disabling the option, restart your computer and check if the problem got solved.
Solution 14: Disabling Fast Boot from your Computer (Post 1709 Update)
Windows 10’s Fast Startup (also called fast boot) works similarly to the hybrid sleep modes of previous versions of windows. It combines the elements of cold shutdown and the hibernate feature. When you shut down your computer, Windows logs off all users and closes all applications similar to the cold boot. At this point, Window’s state is similar to when it is freshly booted up (as all users are logged off and applications are closed). However, the system session is running and the kernel is already loaded up. This feature makes Windows boot faster so you don’t have to wait the traditional time. However, this feature is also known to cause problems in the recent update by not loading the required drivers properly each time. As it doesn’t reload the drivers, some drivers might not be already be loaded. Due to this, your Windows might be crashing from time to time.
Note: For some users, disabling and then re-enabling the fast startup option also did the trick. You can try this. If it doesn’t work, disable fast startup completely.
Solution 15: Disabling Hibernation Mode (Post 1709 Update)
Another workaround that worked for most of the users were disabling hibernation from the computer. During hibernation, the computer goes into a semi-sleep state where some of the information is still preloaded into your computer. We can try disabling this feature. If it doesn’t do the trick you can always revert back the changes.
Note: If your computer still goes into hibernate mode, you can execute the following command in PowerShell as an administrator.
How to Fix Rocket League Crashes and Freezes on Windows 7, 8 and 10How to Fix Windows 10 Freezes & Crashes after Anniversary UpdateWindows 11 Freezes and Crashes Randomly? Here’s How to Fix ItHow to Fix Assassin’s Creed Origins Crashes and Freezes


